Please note that only LAWLIFT users who have at least the role of admin can make these settings.
The layout includes Word formatting, which is then applied to your LAWLIFT template.
Layouts
In LAYOUTS you can quickly get started with the formatting of your automated Word documents.
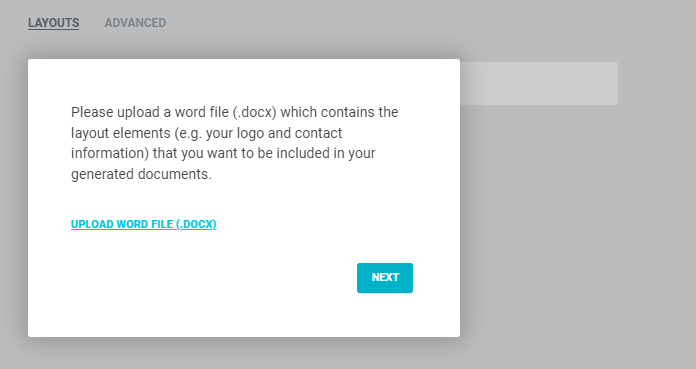
Layouts allow you to upload the formatting of your Word file directly into LAWLIFT. Please upload a Word file (.docx) containing the static layout elements (e.g. your logo and contact details) that should be included in the documents generated later.
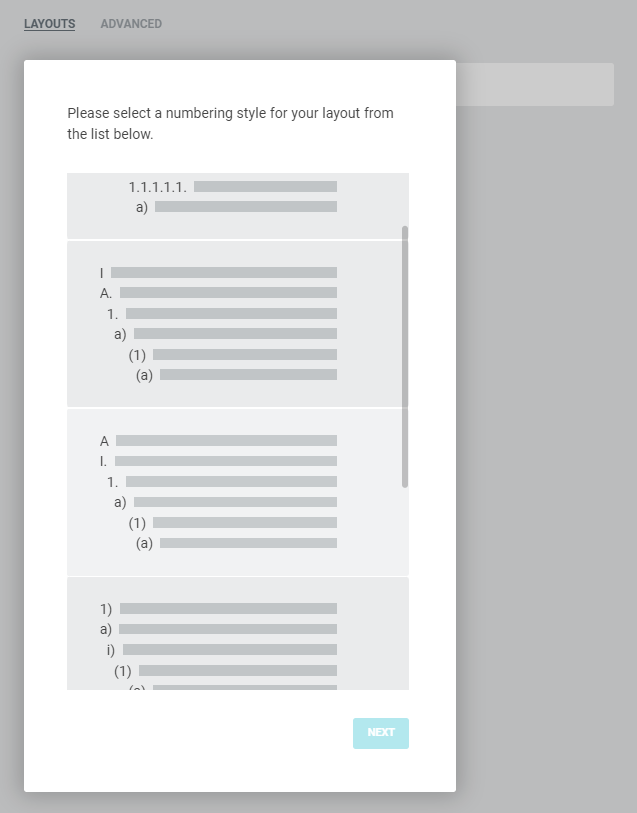
After that, you will be asked to choose a numbering style. Select a numbering sequence.
The title of the Word file is entered automatically, but you can choose a layout name. Click SAVE LAYOUT to create your layout.
You can choose a STANDARD among all your layouts, which means that all templates that have not been assigned their own layout will be linked to the default. When you move the cursor over the layout, the DELETE and STANDARD fields appear. Click STANDARD if you want to select it as default.
You can find the layout you have just created under both LAYOUTS and ADVANCED. Under ADVANCED you can download the layout if necessary and further customize it in Word.
Advanced
In addition to the quick start via layouts, you can also create formatting completely individually.
Of course, you can also download one of your previously created layouts under ADVANCED and continue working on it in Word.
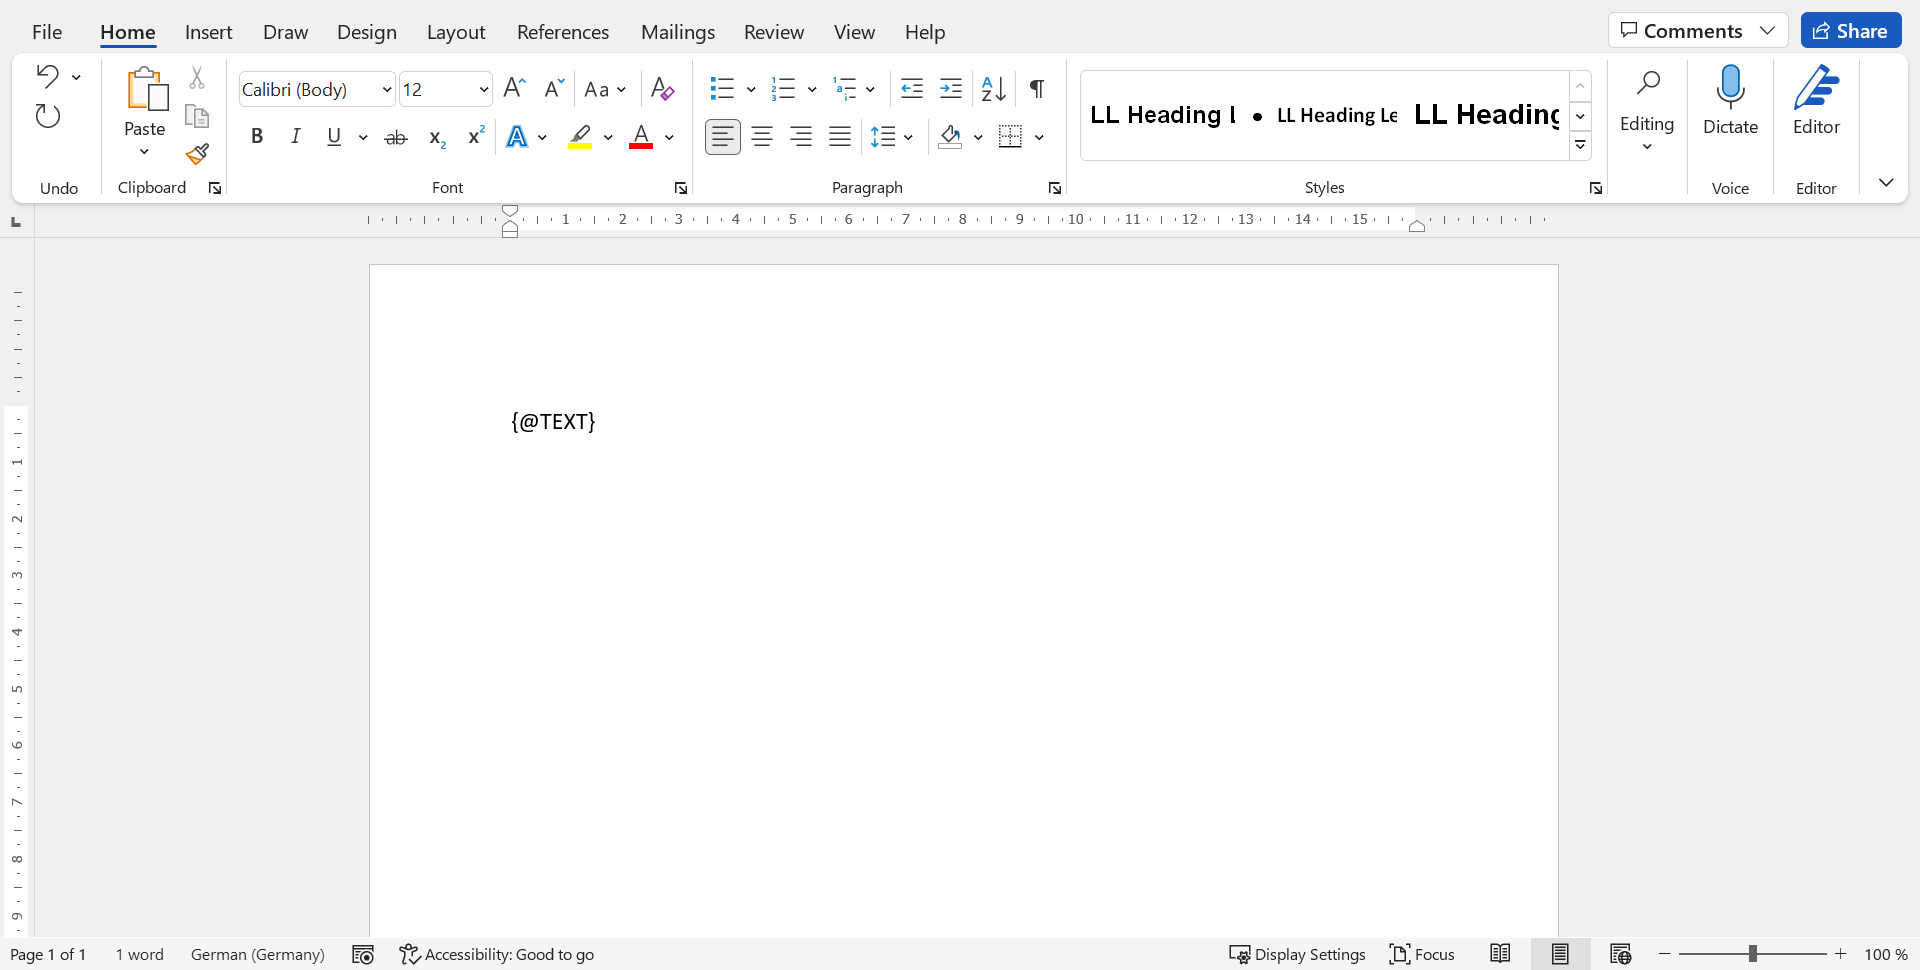
The downloaded file will look more or less like this:
Now open the Styles so that you can make changes to the formatting.
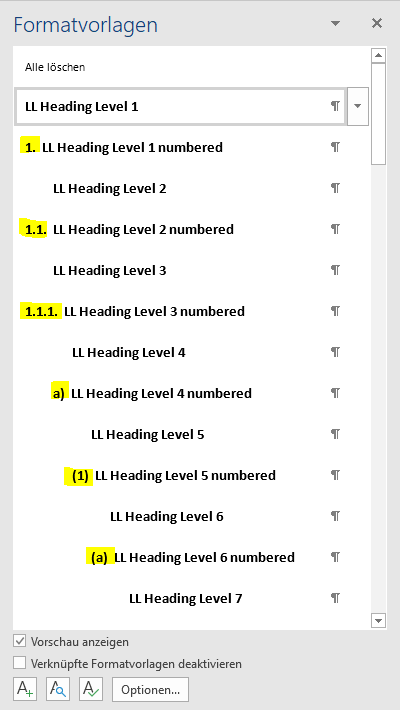
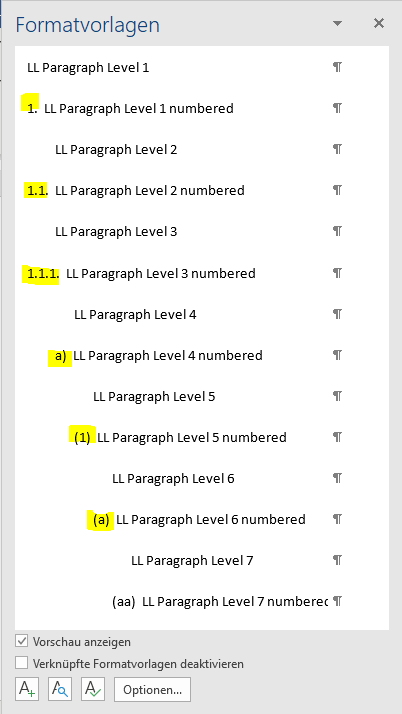
Here you can see all elements available at LAWLIFT where changes can be made. LAWLIFT is divided into headings and paragraphs and can be controlled by the nine different levels as well as the settings via numbering.
LL Heading Level 1 numbered :
LL stands for LAWLIFT
Level 1 determines the level of the element
Numbered means that this element is numbered (if 'numbered' is missing, the element is not numbered)
At LAWLIFT we have nine levels in total for headings and paragraphs. In the standard letterhead template, these elements are called LL Heading Level (...) for unnumbered headings and LL Heading Level (...) numbered for numbered headings. LL Paragraph Level (...) stands for unnumbered paragraphs and LL Paragraph Level (...) numbered for numbered paragraphs.
There are nine levels in total, i.e. the nine levels are distributed among the headings and paragraphs and there are not nine times headings and nine times paragraphs.
I. Formatting
1. Default Settings
We start with our default settings, which apply to our entire document, e.g. font, font size and paragraph.
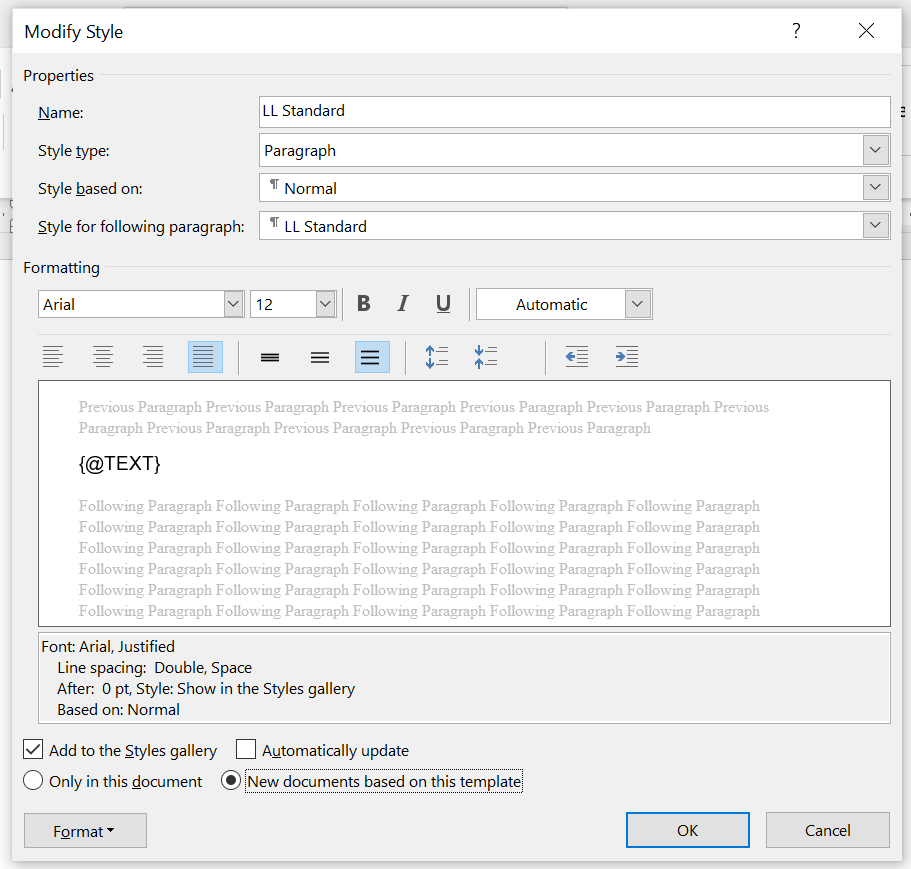
Scroll down in the styles to the LL Standard format. Move your mouse over the format template, click on the arrow and then on modify. A new window will now open.
You can now make all changes that should apply to the entire document. Under format, you will find further settings.
Please ALWAYS click on "New documents based on this template", because you want to create a layout that refers to further documents and should not only apply to the individual document.
Do not change the properties of the style sheets, i.e. especially not the field "Style based on" or the name.
After you have made all changes, click on "OK".
2. Numbering
We have included an inheritance system, which means that certain styles are based on other styles. This is particularly important for numbering in order to implement the nine levels stringently. In concrete terms, this means that paragraphs inherit the numbering of the headings ( LL Heading Level 1 numbered transfers its numbering to LL Paragraph Level 1 numbered; LL Heading Level 2 numbered transfers its numbering to LL Paragraph Level 2 numbered, etc.)
Step 1:
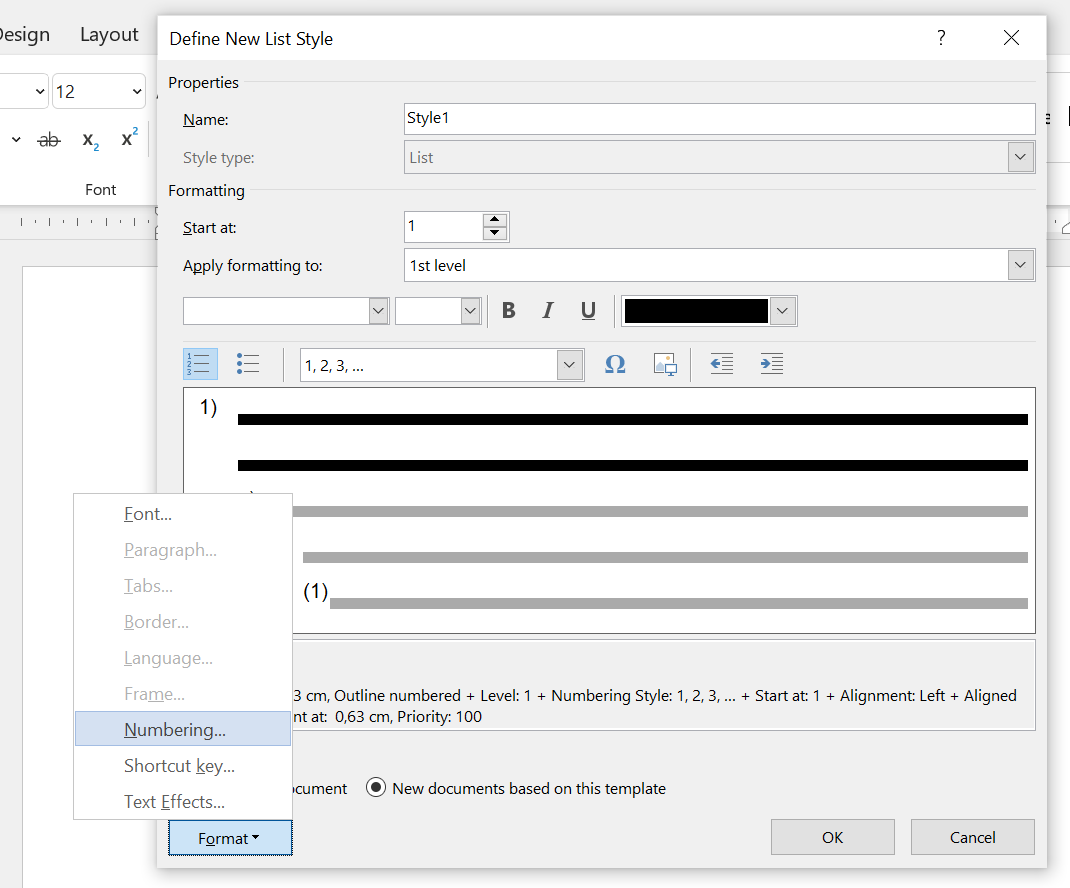
In practice, this means that we number the headings only ( LL Heading Level (...) numbered). To do this, scroll to the LL Heading Level 1 numbered format, click on the arrow and then on modify. In the new window at the bottom left, click on format and then on numbering. A new window will open. Click on define new number format at the bottom.
You now have the possibility to define your own number format, which should apply to level 1 (headings and paragraphs!). Then click on "OK". In the numbering library, select the number format you created and click "OK" again.
Please click on "New documents based on this template".
Proceed in the same way for all further levels that you want to change.
Now scroll down to the LL Paragraphs Level 1 numbered etc. and check that the numbering you have entered for the headings has been applied to the paragraphs.
If individual numberings were not accepted, it helps to make the settings under the LL Headings Level (...) numbered again in the same way described above.
Then close the window with the style sheets.
Step 2:
Now, please click on the button Multilevel List. Now select Define New List Style.
Now click on the format in the newly opened window and then on numbering. A new window will now open. Click on expand at the bottom left.
Now define the number format for level 1 under entering formatting for number as the same number format that you have previously defined in the format templates for level 1. Then click on the arrow next to "link level to style" and select LL Heading Level 1 numbered.
Now click on Level 2 on the left-hand side. Define Level 2 and connect the style to LL Heading Level 2 numbered.
If you want to include level numbers from previous levels in the numbering (e.g. for the number format 1.1), you can select this under the setting include level number from.
Continue in this way for all further levels required. Then click "OK".
Please click on new documents based on this template.
3. Further format settings
To edit the individual elements, open the format templates again. You can now define your desired formatting for each element. To do this, click on the arrow next to the respective element (e.g. LL Heading Level 1) and then on change. In the window that opens, you can now define the formatting of this element.
Please click on new documents based on this template.
II. Upload the Layout to LAWLIFT
In LAWLIFT, click on LAYOUTS in the Dashboard and then click on ADVANCED. Now click on the button now UPLOAD NEW STYLES TEMPLATE. Select the file you have just created.
Link the Layout with the LAWLIFT Template
Afterwards, you have to link your layout with the LAWLIFT template. To do this, go to the edit mode of the respective template in LAWLIFT and select your layout under OPTIONS.